When thinking about web analytics it would be remiss to not mention a tag management solution. Tag managers have been around for about 15 years. Google launched Google Tag Manager (GTM) in 2012. GTM integrates nicely with Google Analytics and other Google tools.
What is Google Tag Manager?
All tag managers create a container that allows website owners or marketers, even non-technical ones, to place and manage all their third-party scripts, or code snippets. As Google explains, these snippets of code are called tags. Tags are fired when a certain event happens. These events are called triggers. Common third-party scripts used in tag management tools are web analytics, A/B testing tools, and advertising partners. Google Tag Manager also introduces the dataLayer which allows for custom events and variables.
What’s the dataLayer?
Think about the data available on an analytics request when a user views a product page. The data could include a unique user ID (if the user is signed in), information about how the user was acquired within that visit, and, of course, product details. As a marketer, you want to share this product view data with your customer relationship management (CRM) tool, your website tracking, and advertising tools. Instead of having to push the different data from this event that each tool uses, you can push that information to the dataLayer one time. Then all those tools can access what data it needs from the dataLayer with separate tags.
Pros of GTM
Reuse variables and triggers
As mentioned before, multiple third-party tools can get the same information from the data made available in the dataLayer. However, Google Tag Manager also allows you to create triggers, or events, which are used to fire the different tags. These triggers can be used to fire multiple tags. So the product view event can be used as a trigger in a “ViewContent” Facebook Pixel Tag and an e-commerce Google Analytics tag. Having established triggers and variables also makes it easier to migrate tools, like switching over to GA4, or integrating new tools, such as adding a privacy control tool.
Integrate cookie control
With CCPA and GDPR, cookie control management is a necessary part of website tag management. Tracking and advertising scripts should not be fired until a user opts into them. When using a tag manager, the cookie acceptance (or rejection) can be passed as a GTM variable. The trigger for the tags can require that the cookie type was accepted, which could be indicated by a “TRUE” value in the dataLayer. Cookiebot and Google Tag Manager have teamed up for a more seamless integration for cookie preferences.
Update without a developer
Although one of the most heavily marketed pros to tag managers is the ability to add advertising tags to the website without the need for a developer, this pro comes with a large caveat. A snippet of code must be added to every page of the site that will need to use the tag manager, which is likely every page on the website. Additionally, if your tag management strategy hopes to use custom variables and events, information needs to be pushed to the dataLayer from the website. Alexander (2013) explains how this can be done a few ways, either on the back end or the front end.
If the developers haven’t already created a dataLayer push call on the page’s source code, then data will need to be pulled from the rendered page, or front end code. If the data needs to be pulled from the front end, then someone on the marketing team needs to be comfortable with HTML to find and declare appropriate DOM elements. For example, if a typical onSubmit JavaScript event doesn’t fire on a form, you might need to use a click event that targets the form button. You can use the Chrome Developer Tools to inspect an element and determine the CSS selector for it. If you aren’t sure about CSS selectors, a Chrome extension, like Copy CSS Selector, can help with that.
Testing
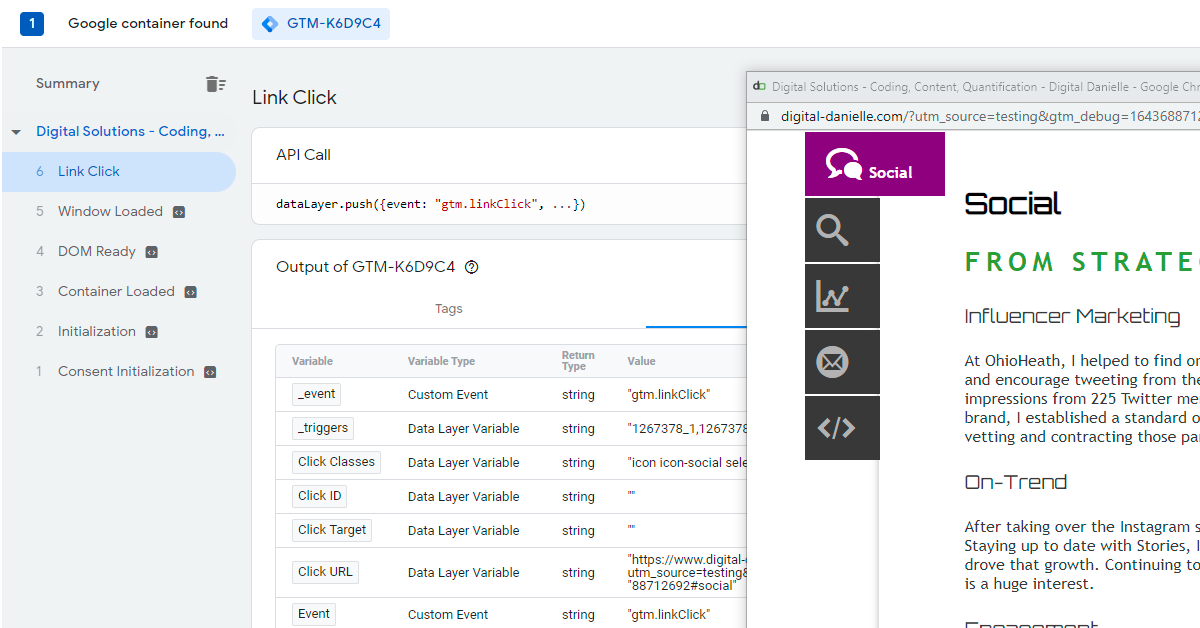
In 2020, Google Tag Manager released a new Tag Assistant tool that makes previewing and testing your tags so easy. Once you’ve updated your container, simply click the Preview button. This opens a new tab that prompts you to type the domain on which you will be testing. (If you don’t have the GTM snippet on your site, you can use a Chrome Extension to add it in). Once connected, the Tag Assistant tab updates to reveal all the events firing on your website, which loads in a popup window. As you click around on your site, the events appear in the left-hand menu. When an event is selected, you can click in to preview what tags are fired from it (if any), the dataLayer, and variables. Figure 1 shows what a preview of the variables available on a built-in link click event. Learn more about testing with this guide from Ahava (2020).
Figure 1
GTM variables from a link clink in preview mode
Cons of GTM
Extra code
Because we are using another third-party resource to load all the other ones, we have more code to worry about. GTM must load its JavaScript file, which then calls each of the JavaScript files used for the tags within GTM.
For my website analytics, I use GTM. My GTM container has 4 tags, 3 triggers, 11 variables (2 of which are user-defined). The JavaScript file is ~38kb. Meanwhile, I’ve helped clients implement extensive custom event tracking in GTM sending to multiple tags. Those implementations can cause the initial GTM script file to be 5x the size of my basic GTM setup’s file. Google offers some advice on how to keep your container from getting too large.
If you were thinking of using GTM just to “add scripts without a developer,” I hope you will consider these more advanced options and approach it with a more strategic view. What data might you be sending to different scripts separately that you can consolidate into the tool? How might you capture that information and share it back to GTM? Happy tagging!
Nice post! Hopefully, some other students will try to implement this also.
ReplyDelete